background

Monday, August 6, 2012

Velcro Bed Skirt

Tim and I got a new bed! We got tired getting pushed around by the pups, and when getting them their own doggie bed didn't work we upgraded to a king size bed. So, of course, I had to re-think the quilt (more on that later). We got a tan colored down comforter for now, which is actually kind of perfect. Not too hot, but keeps us warm at night. We also needed a new bed skirt since our old one wouldn't fit anymore. I've been wanting to add a splash of green in the room, so here was my chance!

A velcro bed skirt was the perfect solution for us. It's easy to make, easy to put on/take off the bed, and when it gets dirty, just toss it in the wash and reattach. It also cost me about $20 including fabric (used a coupon at Joann's), thread (also with a coupon at Joann's), and velcro (no coupon at Hobby Lobby).

First, I measured and measured again. I measured the length and width I wanted it to be and added 2 inches to each for the hems. I wanted the foot of the bed's panel to be 13 inches long x 76 inches wide, and the sides to be 13 inches long x 77 inches wide, so I cut each panel 15 inches long x 78/79 inches respectively.


I hemmed each panel 1 inch around.


Next, I sewed the loops part of the velcro onto one of the  long borders of the each panel.


Then, I pulled out my hot glue gun and glued the hooks part of the velcro to the top of the box springs.


Attach, and voila! A custom bed skirt!


I love how it turned out and can't wait to see how it looks with the completed quilt (one day... ha!)! Until next time....

Sunday, July 8, 2012

my first car

I bought my first car today! Actually, I just bought my car from my dad. But still it's my first big purchase like that. Hopefully soon we can get it all transferred over to my name. That'll be the last thing that I have financially tied to my parents. Kinda crazy. Sometimes I realize that I'm almost 30, which is definitely in the adult zone; but having spent so much of my life in school, relying on others for everything, I feel like I'm just dipping my toes into the adult world. Tim's been so great with all that. He's walked me through a lot of it and only minimally gotten frustrated with my cautious/nervous feet dragging. We've been planning for home ownership in the near future. That's really exciting to me. I've never gone to look at houses like that and chosen where I'm going to live. It was either chosen for me or situations arose that were convenient and agreeable choices. So this is really the first time that we'll be choosing together where we will settle down and start our family; where I can plant my garden in the ground; where we'll be stuck with the craziness of figuring out what to do when it's 100+ degrees outside and the AC just broke. We like the area we are in, and while it's not far away from our friends or family it's out of the way enough that no one ever comes over... we always go to them. And that's fine, but it'd be nice to be able to have people over to hang out and kareoke and cook out every once in a while. So lots of stressful and exciting stuff coming up!

Also, our precious nephew Keating James has arrived!! He's seriously adorable. His mommy and daddy are holding up well, albeit a little on the sleep deprived side. Wish they lived closer so I could cuddle him every day!! Tim's other sister is due soon, so we've got another little nephew to snuggle with coming up! So excited!

Keating on the blanket I made him for some of his pro pics. I know. Adorable.

I'm a proud Titi!

Puppies are doing well.... They were tearing through the house earlier chasing and playing. They're so funny sometimes. Definitely like siblings. They have their moments where they cuddle and play and get along great, and then there are times when they don't want to share toys and push each other out of the way for attention. So cute. I got Ripley a bed today to try and get her to sleep on it at night. She did great on it during the day, but as soon as she say Voltron jump onto our bed, she jumped up, too. We've tried getting Voltron to sleep on a dog bed, but he never quite got the hang of it. Once he slept on the floor in front of it for a bit, but that's the closest he ever really got. Hopefully we can figure this out, because 2 dogs and 2 people in 1 bed do not make for the most comfortable sleep.

Piecing the quilt together has come along. I've gotten 3.5 rows worth of blocks done out of 7. In no rush still, but it's hard to not get too excited and want to spend all night sewing when you see it coming together like that! Going through at least 2 spools of thread each week... I should probably buy it in bulk at this point. Ha. I also took a break from the quilt for a few days to sew some curtains for my nephew who is due in August - Tyler. That was fun! I enjoyed making our curtains earlier this year, and took a  few extra steps for these to make them even more "professional" looking. I lined them an all. They look great, and I can't wait to see them hung up! I've also done a few miscellaneous crafty things lately in preparation for a bridal shower next weekend for one of my besties! More to come on that afterward! :)

Detail shots of the top and bottom, including the lining, and a shot of the first panel I completed.

Finished curtains hanging in Tyler's nursery!

Just thought I'd update on the recent goings on. Until next time.

Tuesday, June 26, 2012

String Quilt How-To

This being my first quilt, I looked through dozens dozens of pictures, blogs, pins, etc. before deciding to make a string quilt. I chose it because it seems pretty simple. All straight lines, sew squares together, and voila! So, here's my version of a tutorial for piecing this style quilt. Please remember in reading this that this is my first attempt at a quilt, so it's a learning experience for me! Also, this is just for piecing the fabric together. I'll do another post about quilting when I actually get to that point.... sometime before Christmas I hope. ha.

I'm intending on making a queen sized (ish) quilt. I purchased fabric in 6 different colors, 2 yards each.


The quilt is made up of squares sewn into blocks. Each square is built on an 8 x 8 piece of paper. I'm using computer paper. My scrapbooking paper cutter came in handy with this part. I've seen people use all sorts of different sizes. I thought about doing 8.5 x 8.5 and making cutting the paper one step shorter, but the math made better sense for the expected end size by using 8 x 8.


Next, cut your fabric into strips. Now, everything I read said to use random widths of fabric ranging from 1 to 2 inches. If you know me, you know I'm not a random strips kind of girl. It'd be one thing if I had a bunch of scrap fabric laying around, but as I'm just really getting into this sewing thing, I don't. I just kept thinking what a waste of fabric that would be! So, I measured and thought and stared and measured again, and I decided to do a wider strip of the cream in the center to better delineate the pattern and equal widths of the other colors. I wanted a finished square to have 2 inches of the cream and 1.5 inches of the other strips. Taking the standard 0.25 inch seam allowance into consideration this is what I came up with to cut:

Cream: 11.5 inches long, 2.5 inches wide
Other colors: 9.5/6.5/3.5 inches long, 2 inches wide


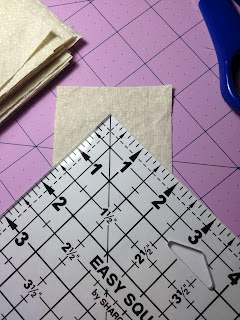
In retrospect, I should probably have gotten more of the cream colored fabric as I'm using a wider strip of fabric in that color consistently throughout the quilt. Hope it works out! I did want the randomness of how the other colors were pieced together, so once all my strips were cut, I mixed them up in each length stack. Then I started piecing. I took a strip of the cream to set up the center of each square, used a glue stick lightly on the wrong side of it, and placed the paper over it. All the blogs I read said to lay the fabric over the paper, but I found this easier to make sure I centered the fabric on the paper. I use a ruler to verify. When it's where it needs to be, I flip the paper over so the right side of the fabric is facing up.

lightly glue the fabric

this helps me see the alignment better than gluing the fabric onto the paper 

making sure it's even!
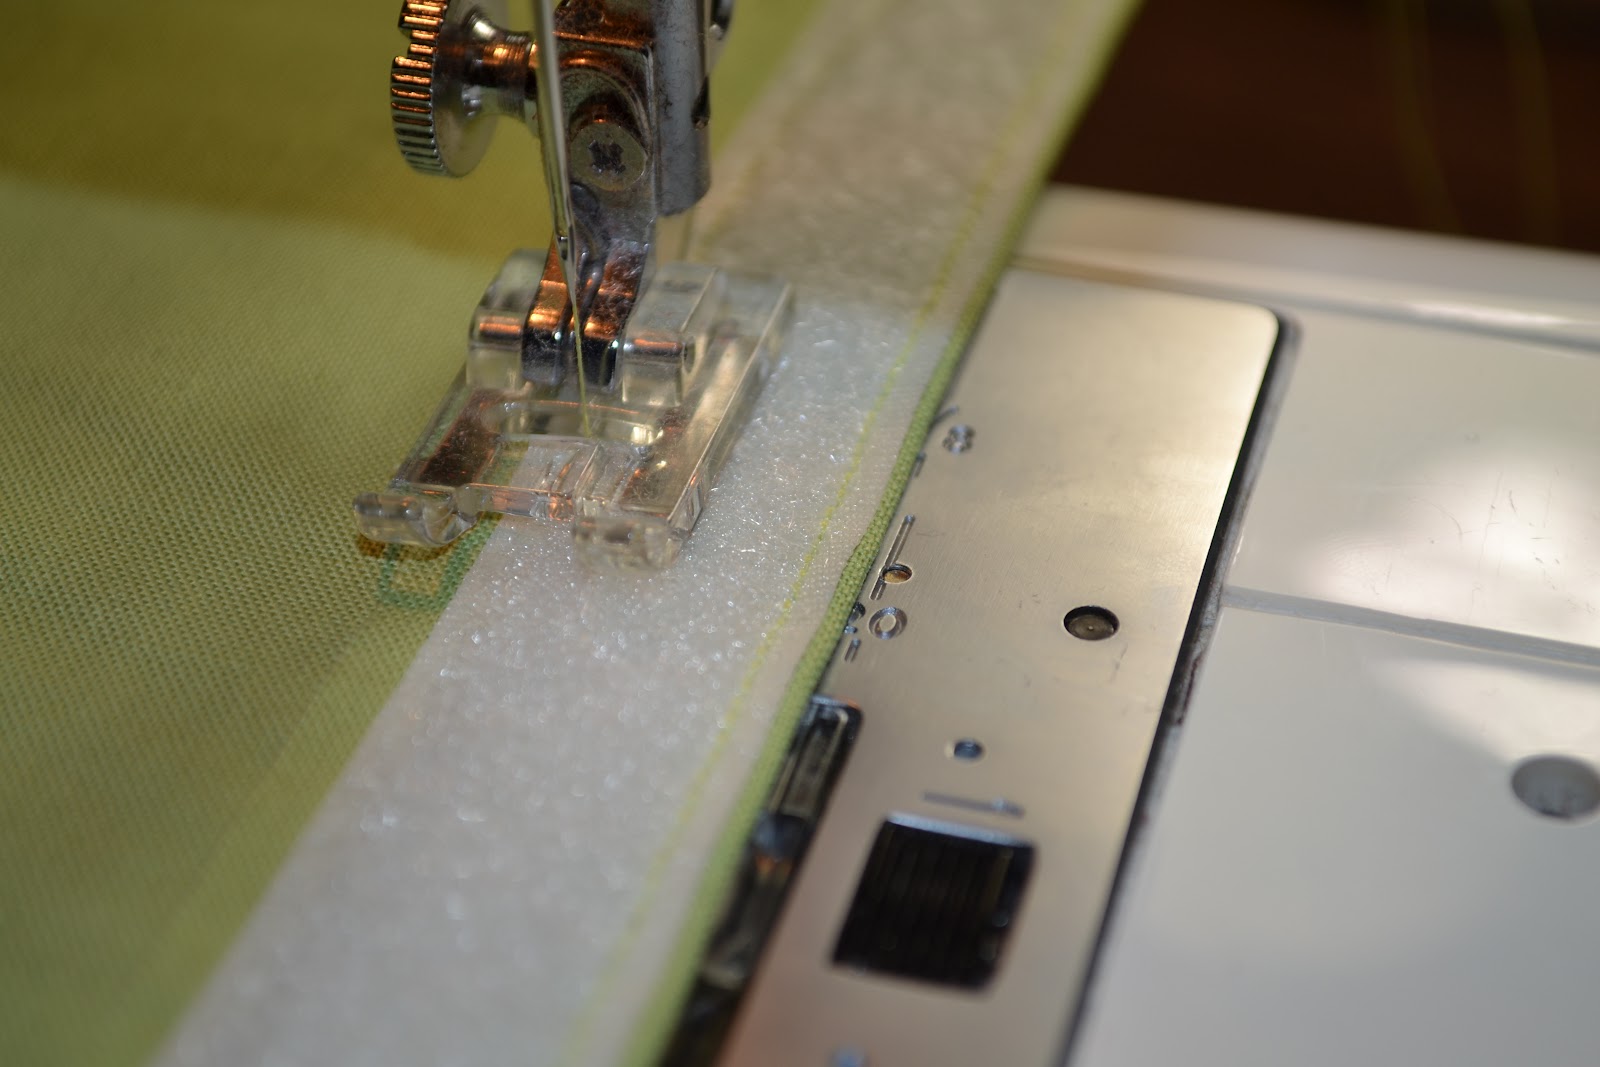
I then take a strip of the 9.5 inch long fabric, lay it wrong side up with the border aligned with the cream fabric's border. I sew them together right on the paper with the 0.25 inch seam allowance. One thing that I found to be very important is the stitch length; you want it to be short so it makes it easier to remove the paper down the line. I set mine between 1 and 2. Iron it open, rinse and repeat.


Once all your strips are sewn onto the piece of paper, trim off the excess. The paper should come off in strips as sewing through it makes perforations. I just fold along the dotted line and it tears right off! 


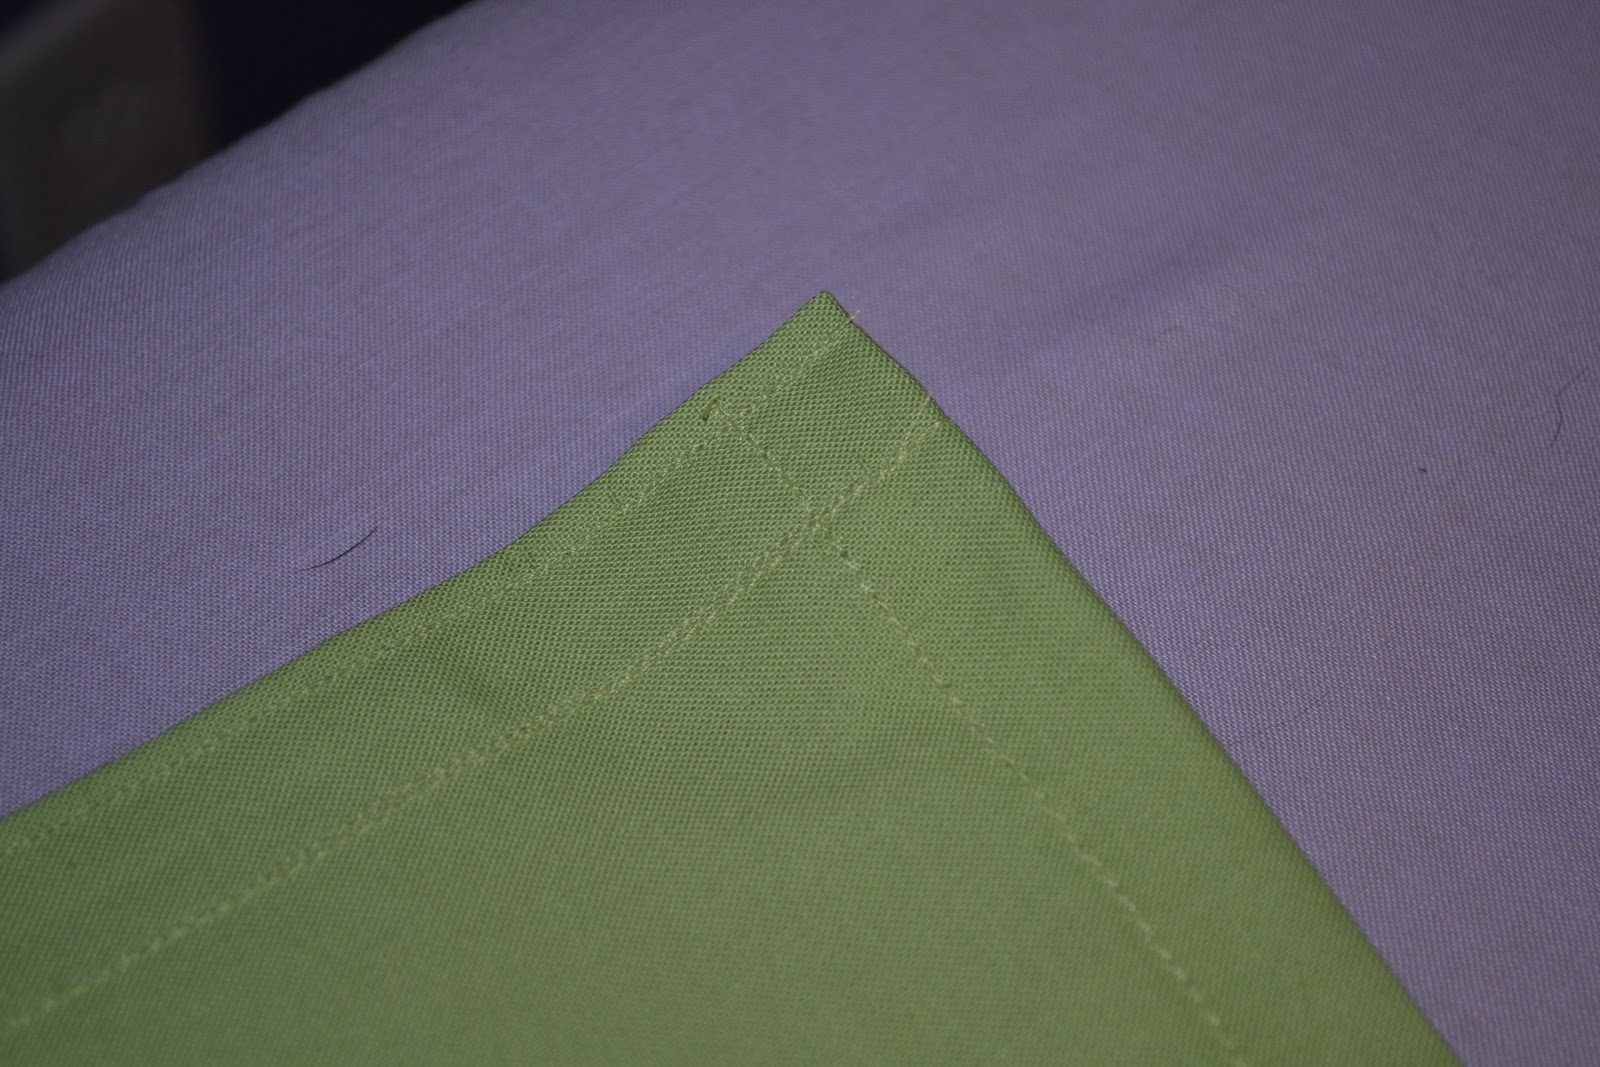
 And tada! You have a super cute square! Sew 4 together to make a block.


I'm kind of addicted now. When I get excited about something I throw myself into it. I've now completed 13 blocks... only 29 to go! Definitely a long term project. I'm so excited to have it completed though. It'll be something that Tim and I will use every day. I love how supportive Tim is of me with things. He went with me to choose fabric, and when I finished my first block he showed a picture of it to all his friends bragging on me. I do love that boy. :)


Monday, June 18, 2012

Quilt?

I may have lost my mind. I decided for my first real quilting project to make a quilt for our bed. I've been wanting to do something like that for a while. In the summer it's more comfortable to sleep with a lighter quilt than a comforter on our bed, so we've been using one that we already had. But..... it's plain, solid, blue and I really wanted something with a little more life to it. I originally thought of making a duvet cover for our comforter, but it would still be too warm.
So, I decided to make a quilt. I told my bff, Jessica, who is by my standards a master quilter. She initially told me that I should probably choose a smaller project to start with. I entirely agree. I should. BUT, what am I going to do with a small blanket? I know it's probably a bit rash, and I'll likely be kicking myself down the line, but I really want to do it.

The fabrics for the quilt!

Today, Tim and I went to Joann's to pick out fabric. I really love the colors we ended up with! And all of the quilting fabric was on sale 40% off! Talk about good timing! :) When we got home, I started washing the fabric and finished a practice quilting project. It's not really quilting, really just piecing it together. Last year an awesome friend, Amanda, and I took a quilting class at Joann's. We never actually quilted, but we did learn the basics of piecing a block together. I pulled out my left over fabric from the class and tried to recreate the block I made over a year ago. It went okay... I did have to re-cut a few pieces of fabric as I cut some too short. But it looks great! Maybe I'll try to quilt them and make pillows as my practice quilting before I do it on the bigger one.

On the left: the block I made in class. On the right: the one I made today!

I do still need a quilting foot for my machine. The only stores that sell accessories for my Janome sewing machine close right around the time I get off work. My mom is going to look around for me tomorrow, so hopefully she'll find one at a good price! It's a little overwhelming trying to figure out what I need and what I don't. My sewing machine is one of my mom's old machines - a Janome My Excel 4023. Nothing terribly fancy, but it does have quite a few bells and whistles I'm looking forward to playing with.

Anyway...... I decided on a string quilt. There are no strings involved, so not sure where the name comes from, but it seems pretty straight forward. Also, Way more experienced quilters have taken months to put theirs together; so don't expect any big progress any time soon. Hope I'm not in over my head! Any advice would be welcome! :)

Update - my mom was able to find a free motion quilting foot for me for less than 25% the cost online! Trying to figure it out... it's really fun to play with so far! Will definitely take a lot of practice to get better control over it.

My mom rocks.

Sunday, June 10, 2012

Baby projects: Baby Earlge

While we wait (some more patiently than others, I'm sure) for my sister-in-law, Colleen, to give birth to her little boy any day now, the Quinlans are also preparing for my other sister-in-law to welcome her little boy (Tyler) into the world! Kate is due in August and her baby shower was last weekend. Once again, I ventured into the world of baby yarn crafts. :) Kate and Kevin are big Braves fans, so I went with a red, white, and blue theme for most of the gifts.


I really liked how the blanket I made for Colleen turned out, so I used the same weaving method with the Martha Stewart loom knitter to make one for Tyler. I used cotton yarn in white and denim for the squares and red for the trim, which I crocheted in a scallop pattern. I really love how it turned out!


In keeping with the Braves theme, I made a really cute diaper cover! I crocheted the diaper cover as well as the baseball and stitched the stitches on. This was a really easy project! I used a couple of different patterns to get an idea of the tapering and amount of rows for a newborn, including this one. This could pretty easily (and I use the word "easily" loosely in my case) be adapted to an older baby or a toddler even and allows a blank canvas to get creative.


I LOVE how this turned out! I crocheted a little baseball cap with the leftover yarn from above and instead of an A for Atlanta, I added a T for Tyler! I used a pattern I found here. Turned out perfectly! :) Can't wait to see him wearing it...!

And last but not least, my husband gave me the idea for these:


Aren't they precious???? I used a pattern I found here for the baby cowboy booties, but definitely had to modify it. Not sure if I just wan't doing it right, but it would have been lopsided had I blindly followed it. I embroidered the stars on as well. SO cute!! 


I so hope Tyler likes yarn, because he's got a lot of it coming his way over the years! Haha! :)


And now I think I'm done with baby projects for a while...... Making things for all these preggos in the last 6 months has been so fun! Definitely got my eye on a few projects for my little ones some day! ;)

Monday, May 21, 2012

One Year Later

A year ago today, I walked down the aisle to my love; my life; my husband. I don't even know what to write about it, honestly. I just smile. He makes my heart smile. Tonight, we celebrated with family. My parents and Tim's mom (Tim's dad is out of town) came over. We had dinner (even used our fine china), ate some cake (so so yummy), and watched our wedding video. It was the perfect evening. We took a long weekend a couple of weeks ago to Asheville, NC as a mini anniversary vacation. It was kind of cold and rainy all weekend, but it was exactly what we needed - restful! It was really nice to sleep in, walk around, and just spend lots of time together.

I do love that I've mostly kept up with the blog. It's really neat to be able to look back through the posts and see the big moments in our first year as a married couple. So here are a few pictures of our anniversary celebration!


at Lucy and Kurt's wedding
Anniversary friendship bracelets
cutting the cake!


Half the cake left... Pleasantly surprised at how good it tasted!
I had this pin on my wedding bouquet. It's currently pinned to the bouquet my Mom-in-love made me for my bridal portraits which I use as a centerpiece on our dining room table.
Family picture!


Monday, May 14, 2012

Toilet paper roll art

I came across pictures of this online and thought, "That's genius! Cheap, easy, and minimal skill necessary!.... Right?" as soon as I saved enough TP and paper towel rolls, I learned that I was right! This project was really easy to put together and looks great in person as well as in the photos.

First step: slice the empty rolls. I did ~1 inch pieces, although for larger projects I'd recommend closer to 2 inches for better support

Next: I pieced together the TP roll slices to decide how I wanted to put it together. I kinda felt like I was playing that game with the blocks where you have to get them to fit into each other to make a picture.


Then: get out the glue gun! I started from the center and worked my way out in circles/rounds. I did change my mind a few times about how far down the slice to put the glue, but an exacto knife came in handy there. I sliced through the dried glue and re-glued where I wanted.


A little spray paint, and voila! It's hanging in the bathroom. Over the toilet. Fitting, wouldn't you say? :)


- Posted using BlogPress from my iPhone